

Taps and dies are cutting tools used to create screw threads in solid substances including, but not limited to, metal, wood, and plastic. A tap is used to cut the female portion of the mating pair (e.g. a nut). A die is used to cut the male portion of the mating pair (e.g. a bolt). The process of cutting the threads in a hole is called “tapping” the hole. The process of cutting with a die is called “threading” (or sometimes “chasing”, although “chasing” as a technical term can have restricted meanings).
There are three types of taps
- Taper Tap:
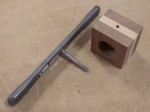 The small tap illustrated at the bottom of the image is similar to a plug tap but has a more pronounced taper to the cutting edges. This feature gives the taper tap a very gradual cutting action that is less aggressive than that of the plug tap. A taper tap is most often used when the material to be tapped is difficult to work (e.g., alloy steel) or the tap is of a very small diameter and thus prone to breakage. The taper tap used on this project is shown, the large handle is to keep the tap as steady as possible when it is being turned to create the thread

- Plug Tap: Also known as an intermediate tap (US only – In Australia and Britain, the Bottoming tap is the Plug), the tap illustrated in the middle of the image has tapered cutting edges, which assist in aligning and starting the tap into an untapped hole. Plug taps are the most commonly used type of tap.
- Bottoming Tap: The tap illustrated in the top of the image has a continuous cutting edge with no taper. This feature enables a bottoming tap to cut threads to the bottom of a blind hole. A bottoming tap is never used to cut threads in an unthreaded hole, as the cutting edges lack the taper required to successfully start into such a hole.
The die cuts a thread on a preformed cylindrical rod, which creates a male threaded piece which functions like a bolt.

 In order to crack the nuts, pressure is needed and this is done with the use of a threaded bar with a “lock nut” screwed onto it. This is fixed onto the handle which is then screwed into the main body. By screwing this down the nuts will crack open.

 Into the main body there needs to be a hole drilled and this needs to be threaded with the same thread as the metal bar, this is done using a tap. The first stage is to put the wooden block into the vice and a try square is placed behind it, this is to help keep the tap straight. If the tap is not put in straight then the crushing nut and bar will be at a slant and when the nuts are being cracked there will not be enough pressure to do it without damaging the sides of the wood.
  A taper tap is used first and then when it is near the bottom of the hole a bottoming tap is used to finish and give the final cut. Keep turning the tap and holder (a quarter of a turn at a time) until it is through the hole. When the thread is cut then the threaded bar is put into the hole to make sure that the threads are cut properly.
 When the tap is being put into the hole to thread make sure that it is vertical and not at a slant similar to the one in the photograph.

its all good
you spelt create wrong in the taper tap part
its a prettygood site
Cool website!!!
JaJq – thanks it is now fixed.
this will help me alot with my revion!!
Thanx!!
woooooooooooooooooooooooooooooo
This Website Helped Me Alot For My Exams.
=]
Thanks =P
That is nice to once and for all find a site where the blogger knows what they are talking about.
Nicely explained the whole process, each step is easy to understand.Really appreciative post.
very helpful, just the stuff i needed for my Graphics and resistant material homework, thanks very much
It ‘s really great to know.Thank you for sharing.