In this section an number of pieces of equipment were used. The Vacuum former was used to create the main part of the housing. There was a wooded mould placed into the machine and lowered, a plastic sheet was secured above the mould and the heating element turned on. The plastic was allowed to heat for 1 minute. The moulds were then brought up to the plastic and the vacuum pump was turned on, this allowed the air to be sucked out between the plastic and the mould, thus forming the required shape.
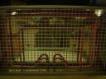
 The mould was then cut out using a Gerbil. To use this tool you need to wear goggles/face protector and make sure that your hands are well away from the rotating blade. As you can see from the picture the blade comes through the surface of the plastic and is potentially dangerous if not used correctly.
In order to Vacuum Form properly a good mould is essential. In class you had the choice of three moulds.
These moulds are made from hard wood or plywood or a mixture of both, which is essential if the mould is to survive a large number of mouldings. The hardwood will allow the mould to give a lot of details and you can see that detail in all three moulds.
Stages in vacuum forming
1 – First, a former is made from a material such as wood. The edges or sides are shaped at an angle so that when the plastic is formed over it, the former can be removed easily.
2 – The former is placed in a vacuum former.
 3 – A sheet of plastic (for example, compressed polystyrene) is clamped in position above the mould.
 4 – The heater is then turned on and the plastic slowly becomes soft and pliable as it heats up. The plastic can be seen to ‘warp’ and ‘distort’ as the surface expands.
 5 – After 1 minute the plastic is ready for ‘forming’ as it becomes very flexible.
6 – The heater is turned off and the mould is moved upwards by lifting the lever until it locks in position.
7 – The ‘vacuum’ is turned on and this pumps out all the air beneath the plastic sheet. Atmospheric pressure above the plastic sheet pushes it down on the mould. At this stage the shape of the mould can be clearly seen through the plastic sheet. When the plastic has cooled sufficiently the vacuum pump is switched off.
8 – The plastic sheet is removed from the vacuum former. The sheet has the shape of the former pressed into its surface.
9 – The excess plastic is trimmed with a gerbil so that only the plastic bowl remains – the completed item.


 The mould was then cut out using a Gerbil. To use this tool you need to wear goggles/face protector and make sure that your hands are well away from the rotating blade. As you can see from the picture the blade comes through the surface of the plastic and is potentially dangerous if not used correctly.


thanks 4 all the information!!!